Written by Ken Marshall
 Audited by Admin
🔍 66+ Products Analyzed
★ 26k Reviews Evaluated

Are you facing issues with your Ninebot scooter not charging? You are not alone. Charging problems can be frustrating, but with the right guidance, you can get your scooter back on the road in no time.
In this article, we all walk you through the common reasons why your Ninebot scooter may not be charging and provide step-by-step solutions. We wll cover everything from basic maintenance and charger compatibility to specific problems indicated by charger lights.
Additionally, we all delve into how to test and address issues related to the battery, fuse, and charging connections.
Common Causes of Charging Problems
Understanding the potential causes of charging issues is the first step to resolving them. Here are some common reasons why your Ninebot scooter might not be charging:
- Bad Contact: Poor connection between the charger and the scooter.
- Faulty Charger: The charger itself may be defective.
- Battery Issues: Problems with the battery cells or connections.
- Charging Port Issues: Loose or damaged charging port.
- Battery Management System (BMS) Failure: Interference or faultiness in the BMS.
- Firmware Issues: Outdated or malfunctioning firmware.
- Environmental Factors: Extreme temperatures affecting charging efficiency.
See Also Why Does Segway Ninebot Scooter Keeps Beeping? [8 Reasons]
Step-by-Step Troubleshooting Guide
1. Checking for Bad Contact
Ensure that all connections between the charger and the scooter are secure. Reconnect the charger to both the wall outlet and the scooter. Sometimes, a simple reconnection can resolve the issue.
2. Verifying Charger Functionality
Check if the chargers indicator light is functioning correctly:
- Green Light: Indicates the charger is working properly.
- Red Light: May indicate a problem with the charger or the battery.
Try using an alternative charger if you have one available. If the scooter charges with the new charger, the original charger may be faulty.
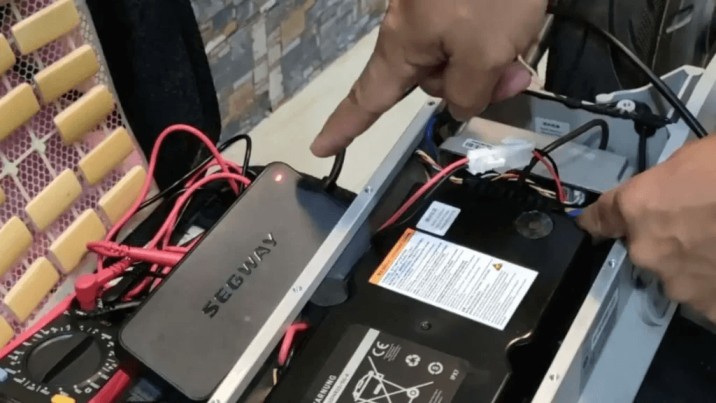
3. Checking Wire Connections Between Charging Port and Battery
Use a multimeter to check the continuity of the wires connecting the charging port to the battery. If there is no continuity, the wires may be damaged and need to be replaced.
4. Performing a Battery Reset
If your scooters battery seems unresponsive, perform a battery reset:
- Disconnect the charger.
- Hold the power/reset button for a few seconds.
- Disconnect the battery from the scooter.
- Wait a few minutes.
- Reconnect the battery and charger.
- Turn the scooter back on and check for charging activity.
5. Inspecting and Replacing the Fuse
If your charger is not blinking red and the scooter does not acknowledge the charger when plugged in, the fuse might be faulty. Follow these steps to replace the fuse:
- Open the rear compartment of your scooter.
- Locate the fuse, which is typically a 5-amp fuse.
- Replace the old fuse with a new one.
- Reconnect everything and check if the scooter charges.
Browse more options here Buybestgear Coupons, isinwheel UK Coupons, and Addmotor Discount Code.
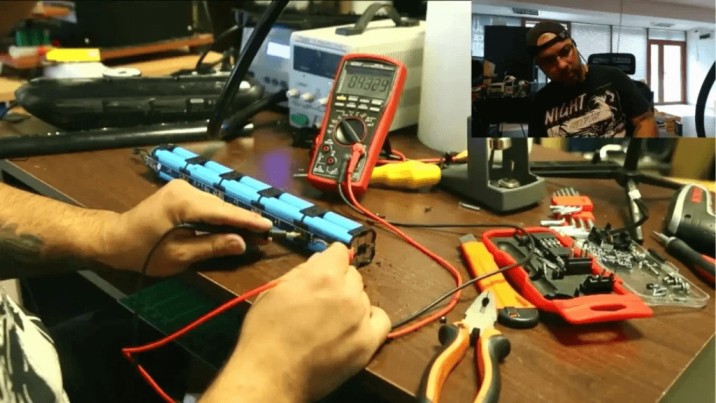
6. Testing Each Battery Cell
If the charger shows a red light when connected directly to the battery, the issue may lie within the battery cells. Use a multimeter to measure the voltage across each battery cell. Significant deviations in voltage indicate a faulty cell, which may need to be replaced.
7. Checking for Firmware Updates
Ensure your scooters firmware is up-to-date. Outdated firmware can cause various issues, including charging problems. Use the Ninebot app to check for and install any available updates.
8. Environmental Considerations
Avoid charging your scooter in extreme temperatures. Both very high and very low temperatures can affect the efficiency of the battery and the charging process. Charge your scooter in a cool, dry place for optimal results.
See Also Why Is Segway Ninebot not Charging? [7 Causes & Fixes]
Advanced Troubleshooting
Inspecting the BMS
The Battery Management System (BMS) is crucial for battery safety and efficiency. If you suspect the BMS is causing charging issues, consider the following steps:
- Reset the BMS: Use the Ninebot app or another compatible tool to reset the BMS.
- Check for Faulty Components: Inspect the BMS for any visible signs of damage or malfunction.
Professional Help
If you have followed all the steps above and your Ninebot scooter still is not charging, it might be time to seek professional help. Contact Ninebots customer support or a qualified technician experienced in electric scooter diagnostics and repairs.
Maintenance Tips for Ninebot Scooter Battery
Regular Charging
To maintain your Ninebot scooters battery for optimal performance:
- Charge the battery after each ride to avoid deep discharges.
- Use the recommended charger and store it in a cool, dry place.
Storage Care
Before long-term storage, charge the battery to 50-70%, store it in a cool place, and recharge it every 1-2 months.
Prevent Overcharging
Use chargers with overcharge protection and unplug them once the battery is fully charged.
Temperature Management
Extreme temperatures can damage the battery. Charge and store your scooter in moderate temperatures.
Routine Inspection
Regularly check the battery and connections for damage or corrosion. Clean contacts and ports for efficient charging.
Battery Replacement
If you notice a significant drop in battery capacity or charging efficiency, consider replacing the battery after 2-4 years.
See Also How to Charge Electric Scooter without Charger (7 Methods)
FAQs
1.Why is my Ninebot scooter not charging?
There are several potential reasons for your Ninebot scooter not charging, including bad contact between the charger and the scooter, a faulty charger, issues with the battery cells, a loose or damaged charging port, or interference or faultiness in the Battery Management System (BMS). Following a systematic troubleshooting approach can help identify and resolve the issue.
2.How can I tell if my Ninebot charger is working?
Check the indicator light on the charger. A green light usually indicates that the charger is functioning properly, while a red light may indicate a problem with the charger or the battery. If the light is off, try using a different outlet or charger to confirm whether the issue lies with the charger.
3.What should I do if the charging port on my Ninebot scooter is loose?
Inspect the charging port for any visible damage or loose connections. If the port is loose, carefully open the scooters compartment to access the port and tighten the connections. If the port is damaged, it may need to be replaced to ensure proper charging.
Conclusion
In conclusion, troubleshooting Ninebot scooter charging issues involves a comprehensive process, including checking charging indicator lights and meticulously following step-by-step troubleshooting procedures. Remember that maintaining your scooters battery through regular charging, proper storage, and avoiding overcharging is essential.
By systematically exploring these causes and solutions, you can enhance the chances of identifying and rectifying the charging issues with your Ninebot scooter, ensuring a seamless riding experience. Happy scooting!
ABOUT THE AUTHOR

Ken Marshall
Author
Ken “Magma” Marshall is currently the CSO and a Partner at RevenueZen, with 4 exits under his belt. He’s been obsessing over helping brands grow through sustainable SEO & content strategies for the last 8 years. Husband, coffee addict, recovering foodie, BJJ bro, and mini Australian shepherd puppy dad. Helping folks build their dreams is my passion.