Changing the tire on your Segway scooter might seem daunting, but with the right tools and a step-by-step approach, you can do it yourself.
This comprehensive guide will walk you through the process of changing a Segway scooter tire, incorporating detailed instructions, general best practices for scooter tire changes, and additional information to ensure you get it right.
Table of Contents
Tools You Will Need
Here is a list of useful tools. You will need some tools to change Ninebot scooter tire.
- Allen keys (2.5mm, 3mm)
- Spanners (10mm, 14mm, 15mm, 18mm)
- Socket set
- Flathead screwdriver
- Tire levers
- Pump
- Clamps
- Vice (optional but recommended)
- Hair dryer or heat gun
- Dish soap and water mixture
- Rubber mallet
- Cloth
- Torque wrench (recommended for precise tightening)
- Valve core remover (optional but helpful)
Step-by-Step Instructions

1. Prepare Your Workspace
- Elevate the Scooter: Place your scooter on a sturdy table or a workbench to have free access to the wheels. Ensure the scooter is stable and secure.
- Ensure Safety: Make sure the scooter is powered off to avoid any accidental start-ups. Disconnect the battery if possible to eliminate any risk of electrical shock.
2. Remove the Wheel
- Unplug Components: Start by unplugging any electrical components connected to the wheel, such as motor wires. Carefully label or note where each connector belongs for reassembly.
- Remove Stickers: Use a hair dryer or heat gun to heat up and peel back any stickers covering the screws. This helps soften the adhesive, making removal easier.
- Unscrew Covers: Use the appropriate Allen keys to remove the screws from the plastic covers on both sides of the wheel. Be mindful of the placement and orientation of these covers for reassembly.
- Unhook Brake: Unhook the brake by removing the 10mm bolt. This will free the brake assembly from the wheel. Make sure to support the brake caliper with a zip tie or similar method to avoid strain on the brake line.
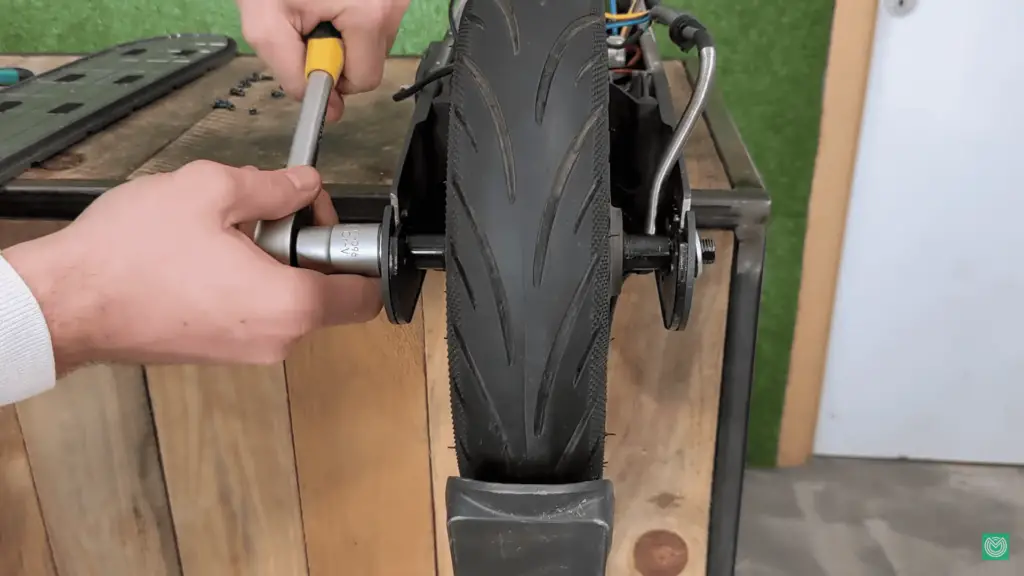
- Remove Wheel Bolts: Use a 15mm spanner to remove the bolts holding the wheel in place. Be sure to support the wheel as you remove the last bolt to prevent it from falling.
- Lift the Wheel: Once the bolts are removed, carefully lift the wheel off the scooter. Place it on a clean, stable surface for the next steps.
3. Inspect and Clean
- Clean Components: Take this opportunity to clean the wheel area, bearings, and other components using a cloth. Remove any dirt or debris that may have accumulated.
- Inspect Bearings: Ensure the bearings are in good condition. Spin them to check for smoothness. Replace if necessary. Lubricate them lightly with bearing grease if they appear dry.
4. Remove the Tire
- Release Air: Deflate the tire completely by pressing the valve. Remove the valve core if you have a valve core remover tool.
- Lubricate Edges: Apply a mixture of dish soap and water around the edges of the tire. This will make it easier to pry the tire off the rim.
- Use Clamps and Vice: Use clamps to push the rubber down and separate it from the rim. A vice can make this step easier by providing additional leverage.
- Pry Tire Off: Use tire levers to pry the tire off the rim. Work around the tire until it is fully removed. Be careful not to damage the rim in the process.
5. Inspect the Rim and Prepare the New Tire
- Inspect the Rim: Check the rim for any damage or sharp edges that could cause a puncture in the new tire. Clean the rim thoroughly.
- Prepare the New Tire: Check the direction of rotation on the new tire. The direction is usually marked on the sidewall of the tire. Make sure to align it correctly for proper installation.
6. Install the New Tire
- Lubricate New Tire: Apply soapy water to the new tire to make it easier to install. This helps the tire slide onto the rim without much resistance.
- Fit Tire on Rim: Place one side of the tire onto the rim. Use clamps to hold the tire in place and use tire levers to work the other side onto the rim. Be patient and work slowly to avoid damaging the tire or rim.
- Ensure Proper Fit: Make sure the tire is seated properly on the rim. Check that the bead of the tire is fully seated all around the rim.
7. Inflate the Tire
- Pump Air: Inflate the tire to the recommended pressure (usually around 40-55 PSI). Use a pump with a gauge to ensure accurate pressure.
- Check for Leaks: Ensure there are no leaks and the tire beads are properly seated by listening for a ‘pop’ sound as the beads lock into place. If necessary, use a soapy water solution to check for air leaks.
8. Reassemble the Scooter
- Reconnect Components: Reconnect the brake and any electrical components. Make sure all connections are secure and properly seated.
- Reattach Covers: Screw the plastic covers back into place. Ensure they are aligned correctly to avoid any interference with wheel movement.
- Tighten All Screws: Use a torque wrench to ensure all screws and bolts are tightened to the manufacturer’s specifications.
9. Test the Scooter
- Spin the Wheel: Spin the wheel to check for any wobbling or resistance. Ensure it spins freely without any unusual noise.
- Test Brakes: Ensure the brakes are functioning correctly. Adjust if necessary.
- Check Ride Quality: Take a short ride to make sure everything is working as it should. Pay attention to the handling and responsiveness of the scooter.
Additional Tips and Tricks
- Use a Vice: A vice can greatly assist in holding the wheel steady while you work on it. It provides stability and makes it easier to apply force when needed.
- Hot Water Trick: If the new tire is too stiff, soak it in hot water for a few minutes to make it more pliable. This can make installation significantly easier.
- Second Pair of Hands: Having an extra person to help can make the process easier, especially when prying the tire off the rim and holding components in place.
- Regular Maintenance: Regularly inspect your scooter’s tires for wear and tear. Proper maintenance can extend the life of your tires and ensure a safer ride.
FAQs
1. How often should I check the tire pressure on my Segway scooter?
It’s recommended to check the tire pressure at least once a month or before any long rides. Proper tire pressure ensures optimal performance and safety.
2. What are the signs that my Segway scooter tire needs to be replaced?
Signs that your tire needs replacement include visible wear and tear, frequent loss of air pressure, cracks or bulges on the tire surface, and a noticeable decrease in ride quality or stability.
3. Can I use any tire for my Segway scooter, or do I need a specific type?
You should use tires specifically designed for your Segway scooter model. Check the user manual or manufacturer’s website for the recommended tire specifications to ensure compatibility and safety.
Conclusion
Changing the tire on your Segway scooter is a manageable task with the right tools and careful attention to detail. By following this guide, you can ensure a smooth and safe tire replacement process, keeping your scooter in top condition for your rides.
Regular maintenance and prompt attention to tire issues can help you avoid more significant problems down the line, ensuring a smoother and safer riding experience.
I’m Arsalan Ahmed, a passionate electric scooter enthusiast and the voice behind this blog. I’m here to share my expertise and insights with you. From in-depth reviews to problem-solving guides, my goal is to help you make the most of your electric scooter experience.


